Using Your Premium IMAP Email Service
There are two main ways to read and write emails using your premium IMAP email accounts. Webmail can be used to access your email system using a straightforward page on the internet. The otherway and and and with an email client such as Microsoft Outlook to manage emails on your computer.
Why Use Webmail?
Webmail is quick, easy and accessible from almost any computer anywhere in the world. All you need is a browser like Chrome, Firefox, Safari or Internet Explorer. Webmail isn’t as highly configurable as an email client. Most businesses use webmail only when they are away from the office or their mobile devices.
Why Use An Email Client For IMAP?
Email clients such as Outlook, Thunderbird Or Mac Mail etc are the best way to manage one or more premium IMAP email accounts on a computer. Using IMAP you can store up to 25GB of email in the cloud and potentially more on your computer’s email clients. Maintaining access to the same emails on different machines can really help with all the work, home and mobile devices available today. Email clients on your devices can help you to automatically file emails and customise spam filters better than you can with webmail pages.
IMAP With A Premium Email Account
To use IMAP email, you will need to contact us so we can provide and integrate premium IMAP email accounts for you. We use Rackspace, a leading provider of premium IMAP email services based in the UK, so it’s quick too.
For a one-off setup fee, we can link your domain to a high capacity IMAP email server which brings you 25GB+ of email storage and the ability to synchronise emails across all of your computers and locations. Of course you also have access to your emails via a webmail page. See below for setup details or call us for more details.
How Do I Use Webmail?
To access your mailbox through webmail, do any of the following:
- In a Web browser, visit the URL webmail.example.com, where example.com is the Internet address of your website. When prompted, specify your full e-mail address as the username (for example, mail@example.com), and specify the password that you use for logging in to the Panel.
- When logged in to the Panel, click the Mail tab, and in the list of e-mail addresses, click an icon
 corresponding to the e-mail address you need.
How Do I Set Up My IMAP Mail Account In An Email Client?
That depends to an extent on which mail client you are planning to use.
We offer set-up information for Outlook, Thunderbird and Mac Mail
Set Up IMAP – Outlook® 2010
If you would like to learn more about the differences between POP and IMAP, please see the help topic, “POP vs. IMAP.”
To set up Outlook 2010 for IMAP, perform the following steps:
- In Outlook, select File, E-mail Accounts, click the Add a new e-mail account radio button and then click the Next button.
- Select the IMAP radio button, Click the Next button and enter the following information:
- Your Name—Enter your first and last name. This is the name that will appear in the From field of messages you send.
- E-mail Address—Enter your entire email address (e.g., myname@mydomain.com).
- User Name—Enter your entire email address (e.g., myname@mydomain.com).
- Password—Enter the password for your email account.
- If you want Outlook to check for email without prompting you to enter your password, check the Remember password box.
- Incoming mail server (IMAP)—Enter the secure server name: secure.emailsrvr.com
- Outgoing mail server (SMTP)—Enter the secure server name: secure.emailsrvr.com
Note: If your internal system configurations require non-SSL ports, please see the “Email Server Settings” page for our full list of available servers and ports.
- Click the More Settings button then click the Outgoing Server tab.
- Select the My outgoing server (SMTP) requires authentication check box. Leave the default setting, Use same settings as my incoming mail server.

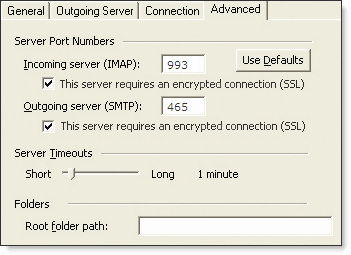
- Click the Advanced tab and select the first This server requires a secure connection (SSL) check box.
- In the Incoming server (IMAP) box, enter the secure incoming port: 993
- Select the second This server requires a secure connection (SSL) check box.
- In the Outgoing server (SMTP) box, enter the secure outgoing port: 465.

- Click the OK button then click the Next button, and lastly click the Finish button.
IMAP Folders:
Folders should sync automatically with an IMAP account; however, if you have added folders in Webmail and they are not showing in Outlook, perform the following steps:
- Select Tools / IMAP Folders and Click the Query button.
- Select the newly added folder(s), click the Subscribe button and click the OK button.
- Restart Outlook to update the folder list.
Set Up IMAP – Thunderbird
For increased security, we recommend that you use our secure (SSL) servers, as detailed below. Note:
To set up Thunderbird for IMAP, perform the following steps:
- In Thunderbird, select File / New / Mail Account.
- In the Your name box, enter your first and last name. This is the name that will appear in the From field of messages you send.
- In the Email address box, enter your entire email address (e.g., myname@mydomain.com).
- In the Password box, enter the password for your email account.
- Click the Continue button.
- Thunderbird will attempt to automatically detect account settings, click the Stop button.
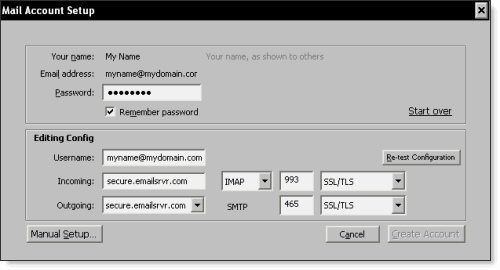
- Under Editing Config, enter the following information:
- Username—Enter your entire email address (e.g., myname@mydomain.com).
- Incoming—Enter the secure server name:secure.emailsrvr.com
- Outgoing—Enter the secure server name:secure.emailsrvr.com
Note: If you have already configured an outgoing server for another account, the previously established Outgoing will be displayed. This can be changed after setup by going to Tools / Account Settings / Outgoing Server (SMTP). - Click the POP / IMAP drop-down menu and select IMAP.
- Enter the incoming port number 993, and select SSL/TLS in the security drop-down menu.
- Enter the outgoing / SMTP port number 465, and select SSL/TLS in the security drop-down menu.

- Click the Re-test Configuration button.
- After Thunderbird verifies the account information, click The Create Account button.
Set Up IMAP – Mac Mail
To set up Mac Mail for IMAP, perform the following steps:
1. Open Mac Mail. If this is the first time that it has been used, the Setup Assistant will appear. Otherwise, select File / Add Account.
Note: If your operating system is Tiger, click the Continue button, and select IMAP from the Account Type drop-down menu.
2. Enter the following information:
- Full Name—Enter your first and last name. This is the name that will appear in the From field of messages you send.
- Email Address—Enter your entire email address (e.g., myname@mydomain.com).
- Password—Enter the password for your email account.
3. Click the Continue button and Enter the following information:
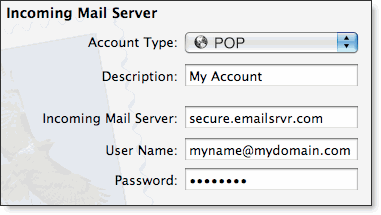
- Account Type—Select IMAP from the drop-down menu.
- Description—Enter a descriptive name for your mail account (e.g., Work Mail or Home Mail).
- Incoming Mail Server—Enter the secure server name: secure.emailsrvr.com
- User Name—Enter your entire email address (e.g., myname@mydomain.com).
- Password—Enter the password for this account.

4. Click the Continue button and Mac Mail will now attempt to detect the incoming server settings. If the Incoming Mail Security window appears, do the following:
- Check the Use Secure Sockets Layer (SSL) box.
- In the Authentication drop-down menu, select Password.
- Click the Continue button.
5. Enter the following information:
- Description—This entry is optional. Enter a descriptive name for your mail account (e.g., Work Mail or Home Mail).
- Outgoing Mail Server—Enter the secure server name: secure.emailsrvr.com
- Check the Use only this server box.
- Check the Use Authentication box.
- User Name—Enter your entire email address (e.g., myname@mydomain.com).
- Password—Enter the password for your email account.
6. Click the Continue button and Mac Mail will now attempt to detect the outgoing server settings. If the Outgoing Mail Security window appears, do the following:
- Check the Use Secure Sockets Layer (SSL) box.
- In the Authentication drop-down menu, select Password.
- Click the Continue button.
7. When the setup process is done, you will see an Account Summary window that summarizes your connections. Click the Create button.
Using IMAP Folders:
To simplify the organization of your messages, you can indicate which IMAP folders Mac Mail should use to store sent mail, drafts, spam, and trash.
1. Select Mail / Preferences, click the Accounts button, located at the top of the window and click once on your IMAP account, as it appears in the Accounts list.
2. Click the Mailbox Behaviors tab, clear all of the check boxes and close the Accounts window.
3. When prompted to save your changes, click the Save button.
4. In your IMAP folder, located in the Mailboxes pane (select View / Show Mailboxes to display the pane if it’s not there), do the following:
- Click once on the Sent, Drafts, Spam, or Trash folder.
- Select Mailbox / Use This Mailbox For.
- Select Sent, Drafts, Junk, or Trash from the resulting list in the sub-menu.
5. The selected folder will disappear from your IMAP list, and will now reappear as the corresponding Mac Mail folder.
